If you’re looking to make your own jewelry, commission a piece from a jeweler, or simply want to know more about the way your gemstones are set in your favorite ring, you’re going to get to know the basic gem settings. There are several styles, and some are made to enhance a gemstone’s brilliance, some are there to hide flaws, and some are there to create an optical illusion.
However, all of them are meant to keep the stone in place and keep it safe. Stones have varying degrees of hardness, and this is always taken into account when choosing a setting. So let’s take a look at the most common gemstone settings, their variations, and how to pick the one most appropriate for you and your gemstone.
Gem settings
Gem settings have been around since antient times, with different styles for different gems. The stones are meant to stay in or on a piece of jewelry, and each setting is meant to both enhance the gemstone’s beauty and keep it safely nestled into the jewelry.
Some have evolved to be very flashy and show off the gemstone’s brilliance, and some have some really interesting optical illusions. We’ll walk you through the most common gemstone settings, how they work, why they work, and they usual variations. This way you’ll be able to better understand why your diamond ring is set that way, or what to ask your jeweler for.
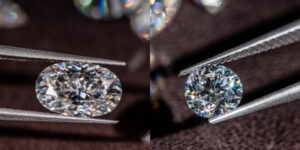
All of these gem settings are talking about faceted stones. Some may be used for natural stones and crystals, though that is a different topic we will soon cover.
Prong setting
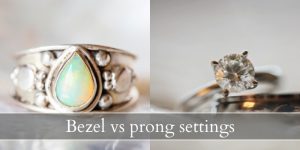
The most common setting type for very hard gemstones like diamonds, rubies, sapphires, moissanite, and cubic zirconia. This setting relies on the stone’s hardness, because it offers very little protection. You cannot pout a soft stone such as opal or topaz or peridot and expect it to not chip, crack, or splinter in this kind of setting.
Also called claw setting, prong setting has a number of claws or prongs (usually at least 4) holding the gemstone onto the jewelry. For rings sometimes the jewel is raised on top of the band, leaving a gap so air and light can be around the diamond. This is called a Tiffany setting, and yes it does trace back to Tiffany & Co.
It is the most common engagement ring setting, and in solitaire rings – a single diamond showcased – it works beautifully. Simple, elegant, and it leaves room for further additions if you want.
Tension setting
Tension setting is only found in rings, and it relies on the tension within the ring band to hold the gemstone in place. The band is made simple, then cut and bent open a little. A gemstone is inserted within the small space, and the tension from both ends of the band keep the gemstone in place.
Other names for this setting are ‘floating diamond’ and ‘suspended’ diamonds because it looks like nothing is holding the diamond. This setting is fairly new technique, and it absolutely needs a very tough stone like diamond, moissanite, sapphires, or rubies. Other stones may splinter.
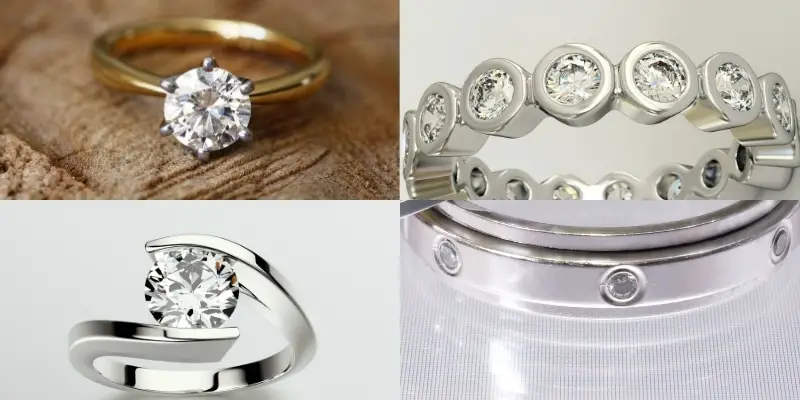
Bezel setting
A bezel setting is the most protective of all the setting styles. You can put any sort of stone in it and it will not crack or chip. It will not shine as brightly, as the back of the stone is completely covered by the rest of the jewelry. A strip of metal – gold, silver, platinum, what have you – surrounds the outer edge of the gemstone, forming a snug fit. Sometimes the edge is raised a little over the gemstone to make sure it’s kept safely.
Any stone cam be set or mounted this way, but it’s most common with softer stones. And it’s often the basis for a halo setting, which we’ll cover shortly.
Flush setting
Flush setting is a very old way of setting stones, and it’s rarely used nowadays because there are better ways to showcase the stones now. You’ll mostly see it in wedding bands, where one or just a few diamonds are showcased.
The bands have a small hole drilled into them, just deep enough to fit the gemstone. The stone is then fitted into the hole, and the result is that it sits flush against the metal, and your finger won’t really feel the difference when brushing across it.
This type of setting is unfortunately prone to lose the stone, if not well done.
Read also: Why Is My Ring Turning My Finger Green ?
Common variations on the usual settings
Those were the 4 main ways of setting a stone, or rather techniques. Using prongs to set the stone in place or buying it into the metal band, or using tension, all of these can be used together in differing combinations.
Most rings you see, the ones that aren’t a solitaire diamond ring, showcase a combination of different stone settings. Below we’ll explain some of the most common variations and combinations, because what you’re wearing right now is likely one such combination.
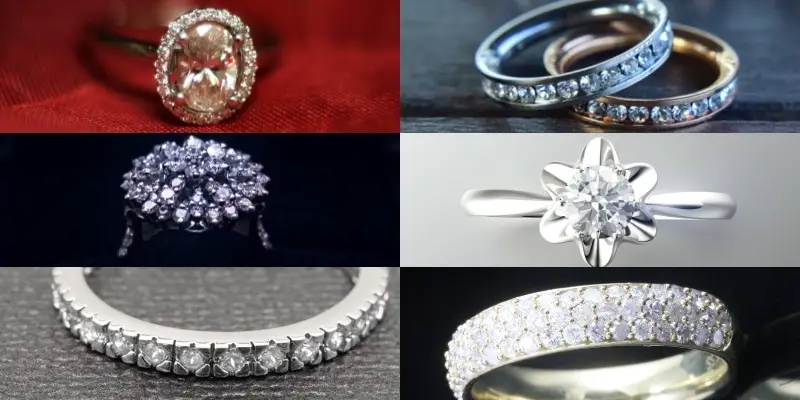
Halo settings
Halo settings are amazingly popular for various reasons, the main one being how large the ring looks. The concept is a single stone in the middle, surrounded by a circle (halo) of other, smaller stones. The center stone can be a single stone, or it could be a cluster of stones, depending on what the jeweler had in mind or what stones you have to offer.
These settings may have a bezel center or a prong center, and the center stone may be a different color from the other ones.
Cluster setting
Cluster settings are meant to utilize very small stones and make them resemble a very large stone, or they can be put together to create a colorful piece of jewelry. Cluster settings rely on small stones set very close together, most commonly with a very tiny prong setting. The prongs are almost always white, because the stones are almost always white.
The overall effect is similar to a halo setting, though you can find both cluster and halo settings in jewelry.
Pave setting
Pave setting is very similar to cluster setting, though the prongs may not show. It’s different from cluster setting in that pave usually runs in a straight line (winder, skinnier, depends on the type of jewelry) while clusters are usually round or form some sort of shape.
Pave settings are what you usually see in very ornate engagement rings, with diamonds running down the sides of the ring as well.
Channel setting
Channer setting is also similar to pave setting, though it works a bit differently. It, usually a single line of gemstones, very small ones, that run along the entire ring, like an eternity ring. The sides are usually raised and a bit blocky, and you may see tiny spaces between the stones but never the metal holding them together.
Buttercup setting
Buttercup settings are most common in rings, though you may find them in earrings or pendants as well. This is an older way of setting stones, and it was meant to form a sort of flower when looking directly at the setting.
There is a center stone, and it’s kept in place with prongs, and the space between the prongs us shaped like a flower petal. Due to the way the petals will catch the light, the ring appears larger and more brilliant. This effect is especially hard to detect when the metal and the stone are of the same color.
Bead setting
Bead setting is a cross between pave and prong setting, where the stones are set deep into the metal band, and a small amount of metal from around the stone is pushed onto the sides of the gemstone. This forms tiny beads that appear to hold the stone in place. When done correctly the entire piece of jewelry may appear to be full of gemstones, when in fact it’s not, it’s just the very well done beads.
Illusion settings
Illusion settings are any combination of settings that are meant to make the stone appear different than it is. All of the above settings can be used together in different combinations to get some really beautiful effects. So here are a few examples :
- prong illusion, where the prongs keeping the stone in place are places to make the stone appear a different shape, or to make it look larger (such as a bead setting).
- cluster halo illusions, where the center stone is actually a cluster of several stones with a surrounding halo of even smaller stones; bead setting may enhance this effect.
- buttercup settings are especially good at making jewelry appear flashy, especially when the stone and the metal are the same color.
Read also: Platinum VS Titanium
What are most common gem settings ?
Prong settings are the most common settings for a stone, especially when it comes to engagement rings which usually feature a diamond. The second-most common setting after the prong setting is a tossup between halo and pave. These are used in a large number of jewelry pieces to create the impression of more jewels than there really are, and to accentuate a center stone if there is one.
Common versions of engagement rings featuring these are:
- center stone sings with pave stones going down both sides of the ring
- halo rings with at least one halo, possibly with pave stones going down the sides
- eternity rings, with stones all around the ring
- cluster rings, with a bigger center stone and 2-3 smaller stones at either side, resembling a marquise shape
Tips on choosing the right setting for your jewelry
If you’re looking to get a bespoke jewelry piece and you want it to incorporate a certain gemstone, you’re going to need to take into account some things, like the overall shape of the jewelry, the shape of the stone, its hardness, and what effect you want (if any).
So here are our best tips on figuring out what would work best for most gemstones, depending on what you’re working with.
Large gemstones look best on their own, in a claw setting
If you’ve got a very large stone, a perfect 3 carat diamond, you may be tempted to make it shine even brighter. The thing is, big beautiful stones need to be alone on jewelry. A big diamond looks best when it’s a solitaire, so it’s the only attention-grabbing stone.
As a diamond, it’s very hard so it will withstand nearly anything. Any setting will work, but a prong setting will really show it off.
To make the ring or jewelry stand out without adding more stones, you could request a different finish on the metal. For example:
- a filigree finish, that’s a lace-like work of thin wound metal and it looks very beautiful and delicate
- a certain cut pattern on the jewelry so the metal itself is not flat, it would have some texture like sand, leaf patterns, tree bark, or rough metal
- two-toned metal in any color you want
A smaller gemstone can look larger with an illusion setting
Small gemstones are more affordable but they are less impressive than larger stones. However you can use a prong setting to make an optical illusion that the stone is actually larger. This only works if the stone and the metal are the same color.
For example on a round-cut small diamond you can request three-bead prong (fishtail) to simulate 4 corners, so the overall effect is a princess cut (at first glance).
Another illusion would be a bead halo. A center stone, small, but with a bezel set and 2 rows of beads after that. If done right the overall size of the stone should appear larger.
A buttercup setting is always going to look impressive for small and medium-sized stones. These work best if the metal and the some are of similar color. Viewed from above the eye finds it difficult to figure out if the gem is large or it’s just a flower.
A brittle, soft stone should have a bezel or halo setting
If you’re working with a soft stone, such as opal, coral, moonstone, amber, and so on, you’re going to need a very protective setting. First off, these stones are almost always cut (or rather, shaped) into a cabochon. That is a rounded, highly polished shape with a flat back, and it may have different sizes.
As these stones are soft and brittle, they need extra protection so you need a bezel setting. You can leave it at that, or go a little further and add a halo around the center stone. Depending on what gemstones you’re working with it may or may not be more expensive than just the center stone.
A halo effect can also be achieved with some delicate filigree and beading along the outer edge of the bezel, without actually adding more stones.
Bead setting can make tiny stones appear more impressive
If you have a collection of small stones, setting them in a pave can make them stand out more. You can go for a cluster setting, wither pave or beaded.
A cluster will form a larger-looking shape made of of those stones. If you use beading each stone appears a little larger, thus the entire piece appears larger.
Gemstones with sharp edges need protection
If the gemstone you’re working with has some really sharp edges – marquise, princess, pear, trillion – those need protection, and it usually means that’s where a prong will go. In a gemstone a sharp corner is a point of weakness, meaning it’s where it will most likely crack. So it, must be protected.
You can base your design on what edges need to be protected, and even work something around them. Or you can leave the jewelry plain, with just the gemstone to shine and grab attention.
I’m the main author for jewelrymaterialguide.com. I started this site after we did tons of research before our wedding and noticed that there is information about rings, jewelry, and so on that is really hard to find on the internet.